Using MC3 and MC5 with the Ursa Minor Program
The Ursa Minor Pro program fully supports MC3 and MC5 controllers. Even if you intend to use some other software, such as the Ascom driver, you might want to try the Ursa Minor program. The Ursa Minor program is an excellent tool for understanding, practicing, and configuring MC3 and MC5 controllers. Even if you prefer to use other programs there might be occasions when it would be recommended to use the Ursa Minor program, for example to making sure the park position is correct or the encoders are working properly. If you experience any malfunction (such as trivial misalignment), I always suggest that you first try to reproduce the error, understand its nature, and correct it with the necessary settings using the Ursa Minor program.
Both MC3 and OC5 have the ability to operate in two very different modes. I find it important for the user to understand the specifics of these modes of operation.
Operating modes:
- High level operation.
- This is the default, and recommended mode of operation. In this mode the control electronics itself performs astronomical calculations, manages the Meridian flip, and takes into account geographical position and time. In this case, we give the control electronics a command like this: "Go to the target whose coordinates are Ra = hh.mm.ss Dec = dd.mm.ss and follow its movement at sidereal speed!"
- Low level operation.
- This mode is intended for experimental use and can only be used with Ursa minor program. In this mode the control electronics is actually downgraded to a "stupid" motor controller. In this case, we give him simple commands such as "Make x number of steps with y speed in positive direction with motor number 1". This requires some advanced device (computer or handset) to perform the relevant astronomical calculations, taking into account geographical position, time and considering the type of mechanics (Meridian flip for German equatorial mechanics)
The electronics are capable of both modes. Therefore, two types of protocols are supported. The low-level and high-level ones.
Although the controller is capable of both modes of operation, it can only be in one state at a time, that is, either low-level or high-level. For example, if you want to give both high-level and low-level commands, such as high-level commands with the hand control and low level commands with the Ursa Minor program, it can cause a lot of issues. Similarly, we will experience many problems when we are not aware of these and intend to use the tool in high-level mode whilst it is actually in low-level mode. To avoid this kind of problem, I recommend that you read the following instructions carefully, and set up and practice your system accordingly. You need to be aware of the OC5 mode you are using (low level or high level) and what settings are needed in each case and which component (OC5, hand controller, Ursa Minor program, Ascom driver, Ascom client program (such as MaximDL or Prism) or Hydra) is responsible. If we make a mistake here (for example, we think the hand controller is responsible for the exact time, while it is the responsibility of the Ascom driver), malfunctions will occur.
It is very simple to remember: The Ursa Minor program supports both low level and high level operation. Any other way of operation (Using the MC5 with hand controller or use the MC5 with Ascom driver uses all the time the high level mode.)
First case:
Low level operation with Ursa Minor program.
The ursa minor program is responsible to take care of any astronomical calculations, such as converting celestial coordinates to machine coordinates and dealing with time and geographic position. The Meridian flip, side of pier also calculated by the computer.
Second case:
High level protocol with Ursa Minor.
The time and location are managed by MC5 itself. It is important to have a coin battery in the MC5. It is a prerequisite that the geographical position is set correctly in MC5. The precondition is to set the exact time in the MC5.
Third case:
High level protocol with hand control. In this mode we use the MC5 entirely with the hand controller. Previously we had to set up the MC5 properly with the MCConfig: The geographic position, time and park position had to be set properly.
Fourth case:
High level protocol with the Ursa Minor program and the hand controller together.
You can use the MC5 with computer and the hand controller at the same time.
Fifth case:
High level protocol with Ascom driver.
It is advisable to try this only if the fourth case (High level protocol with Ursa Minor program and hand controller) is already successful and you know how to set it up.
Sixth case:
A High Level protocol with Ursa Minor program, using absolute encoders.
If you can use the system in the previous mode (with Ursa Minor program and the hand controller together) without any problem, you can step forward to use it with absolute encoders.
Seventh case:
A High Level protocol with any program via ASCOM driver and absolute encoders.
I recommend to try the previous case first (Use the system with Ursa minor ptogram and absolute encoders). If there are no problems, you can step forward to use the system with Ascom driver and encoders.
Low level operation with Ursa Minor (as in the first case...)
This case is intended for experimental use only. For example: When you developing new mount. Also it is not recommended for normal operation. Please try the other use cases.
High level operation with Ursa Minor (as in the second case...)
Do not use the hand controller during initial setup and testing, and do not connect it to the controller electronics! In the next few steps, just connect the controller electronics to your computer with a USB cable, do not connect any other device! (Hand controller, autoguider)
Before using the device, make the following settings!
- Use MCConfig to set the direction, speed, and acceleration of the motors.
- Also use MCConfig to set the geographical position.
- Save the settings with the "Save settings" button!
Then use the Ursa Minor program to:
- Connect to Control Electronics with a High Level Protocol (Either binary or ascii compliant)
- Read the position of the controller to make sure that the setting in the controller has not been forgotten. To do this, in the Ursa Minor program, select "Setup" from the menu and then "Set geographic position".
- You will then see that it is divided into two panels. The left hand side contains the Ursa Minor program's own setting and the right hand side contains the controller electronics.
- In the latter panel, press the "Read from the telescope controller" button! The geographic position known to the
controller will appear in the fields below the button. That must be correct! The following
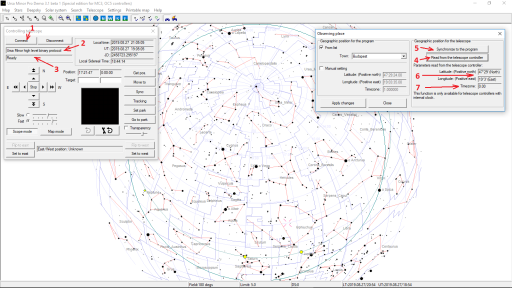
image shows how the screen should lokks like. (Clisck on the image to show it at the original resolution.)
Explanation:
- By pressing the button 1. we connect to the telescope controller.
- In the text field 2, we can see the selected protocol: Now it is the "High level binary protocol"
- In the text field 2, we can see that the connection built successfully.
- By the button 4. we read the geographic position from the telescope controller.
- The geographic position displayed in the text field 6.
- If these coordinates are not correct, press the button 5. The geographic coordinates will be transferred from Ursa Minor program to the telescope controller.
- Press the button 4 again, and check the new coordinate values in text field 6.
- In the text field 7. we can see, the timezone is zero. Now it is not a problem, as MC3 and MC5 (OC5) handles the time in UT, and does not care about the time zone.
- Let's read the time from the controller. This is to check that the internal clock of the controller is working properly (the button battery on the MC5 base panel is powered even when off). To do this, in the Ursa Minor program, select "Setup" from the menu and then "Set time".
- As in the previous window, we see that it is divided into two panels. The left hand side contains the Ursa Minor program's own setting and the right hand side contains the controller electronics.
- In the right panel, press the "Read from the telescope controller" button! The box above the button will then show what the controller says is the current time in UT. If you have not set the time, you will get an incorrect value here.
- Press the "Synchronize to program" button to set the time. At this point, the time given by the Ursa Minor program is transferred to the control electronics.
- To make sure this is successful, press the "Read from the telescope controller" button again! You should now see the correct time in the box above the button . After a while, press the "Read from the telescope controller" button again. We have to see that time passes properly according to the electronics clock.
- Just in case, let's break the connection, turn off the MC5, and turn it on in a little while and read the
geographical position and time! We have to find that the MC5 did not forget its geographical position even after the
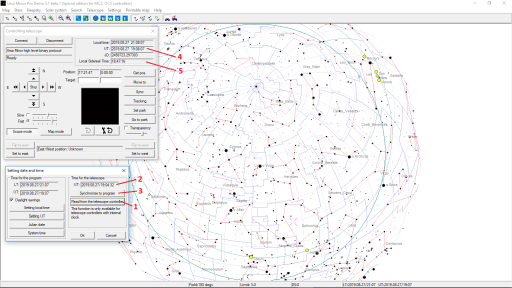
power was turned off and its clock was turned off. The following image shows how the screen should lokks like. (Clisck
on the image to show it at the original resolution.)
Explanation:
- By pressing the button 1 we read out the time from the telescope controller.
- The time is displayed in text field 2. This should be equal with the time in thext field 4. (Small amount of difference is allowed.)
- If the time in telescope contoller is incorrect, press the button 3! This will synchronize the controller's clock to the system time of the computer.
- By pressing the button 1 again, we could see correct time in field 2.
- In the text field 5, the local sidereal time is displayed.
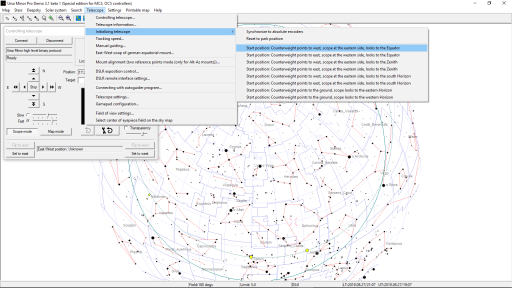
- Then initialize the telescope! Enter the "Telescope / Initializing telescope" menu. Here, select "Start position: Counterweight points to the west, scope at the eastern side, looks to the Equator". In this case, no telescope movement occurs, only the system initiates the internal position variables.
- In the Ursa Minor program, select the "Full Sky" view to display the total visible sky in the middle of the screen with Zenit.
- Move the telescope control window on the screen so that it obscures the star map as little as possible.
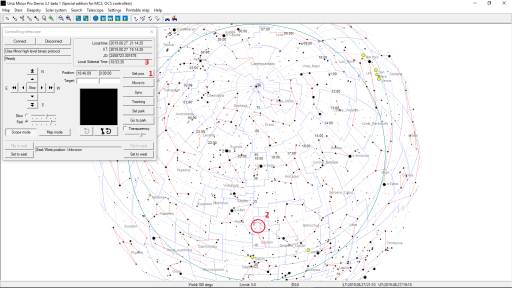
- Press the "Get position" button in the telescope control window! The program will mark the position of the telescope on the map with a crosshair symbol.
- Check that the position is correct! Both the Binoculars and the crosshairs on the star map must be on the Meridian,
the Equator!
Explanation:
- Press the button 1 to ask the current position of the telescope from the controller.
- The croshair symbol shows the position on the sky map at the place marked by 2.
- In the text field 3. the local sidereal time is displayed.
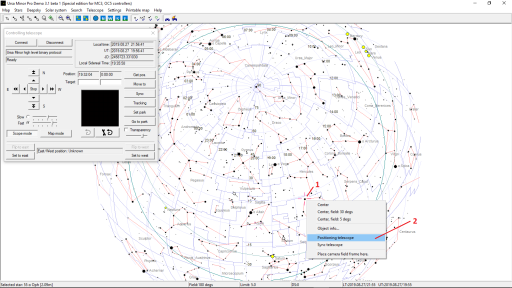
- After getting so far, let's try goto: Select a star on the screen (As a first try, choose where Meridian flip
doesn't have to be executed!) and right click on it!
Explanation:
- The star marked with number 1 was selected. This is indicated by the crosshairs.
- In the pop-up menu for the right mouse button, we select menu item 2.
- Then, select a star on the other side (on the other side of the Meridian). Let's start goto this star! We have to see that the program also executes a Meridian flip during positioning.
Tip: In any case, if you experience a malfunction before getting deeper into troubleshooting, I suggest you perform the above test! The time and geographical position read by the Ursa Minor program must be correct!
High level operation with the hand controller (as in the third case...)
The MC5 controller should be ready:
- It is configured properly with the MCConfig: Gear ratio, motor rotations, motor speeds, current levels, type of mount, geographic position are correct.
- The time should be set properly in MC5 (Check it with the Ursa Minor program)
Steps:
- Initially the MC5 is switched off. It is not connected to the computer, but the hand controller is connected to the MC5. The USB connector of the hand controller in not connected.
- The telescope can be in its park position or one of the predefined default positions.
- Switch on the MC5.
- Wait a few seconds. The hand controller should successfully connect to the MC5 and displays firmware version both for the MC5 and hand controller.
- Press the main button of the hand controller (The large black button on the left side). You go to the home screen. The actual celestial coordinates displayed. If the park position has been set properly, these coordinates should be correct.
- If the coordinates are not valid, no problem, we should init the telescope with the following steps.
- Press the main button for longer time (2 seconds). Now you are in the menu. By rotating the button, go to the "geographic position" menu and press the main button. Check the coordinates. If these are not valid, fix them.
- Please check the time zone setting too!
- Move the selection to the "set" command by pressing up and down buttons. Then press the main button. Now you stored the time in the controller. Now you are back in the main menu. Choose the "geographic position" command.
- Select the "init scope" form the main menu. Scroll the selection to the default position, which is identical the telescope's actual position and select it.
- Now the coordinates in the screen of the hand controller should be valid and the system is ready to be used.
Operation with the Ursa Minor program and hand controller (4th case...)
The operation is similar to the second case (Use the MC5 with Ursa Minor pro program in highlevel mode.)
- Power on the system, and watch the screen of the hand controller. After a short time, you can see the firmware versions of the hand controller and the motor controller.
- Press the main button of the hand controller for short time: You are in the home screen. The telescope coordinates are displayed.
- As the tracking is not switched on yet, you can notice, that the Ra coordinates are not stationary: It increases roughly one second by second.
- Start the Ursa Minor program on the computer and connect it to the MC5 with high level ascii or high level binary protocol.
- Press the "get pos" button in the telescope controlling window of Ursa Minor, and te crosshair symbol appears on the sky chart, representing the telescope position. This position should be the same as in the hand controller's screen.
- The hand controller automatically unparks the telscope after power on. If the telescope was properly parked at the end of its last use, it is ready to be used.
- If not, you should initialize it. It is possible either with the hand controller, or with Ursa Minor program.
- Issue goto commands from Ursa minor program as usual.
- Check the screen of the hand controller: The hand controller refresh its screen by every second: The coordinates on the screen should be vaild. During the goto movement (started by the computer), the movement of the telescope is reflected by the live coordinates on the hand controllers screen.
- You are free to start goto movement from the hand controllers menu, as usual.
- You can read the position of the telescope in the Ursa minor program, by pressing the "get pos" button in the telescope controller window. The crosshair symbol should indicate the actual position on the sky chart, as the telescope moves. (Please press the button repeatedly)
Operation with Ascom driver (5th case...)
This operation is described on the following page.
Operation with the Ursa Minor program and absolute encoders (6th case...)
Before start, ensure:
- MC5 is fully configured with the MCConfig
- Geographic position and time is properly set in MC5
- The absolute encoders are set properly:
- When the telescope in its default eastern position (telescope is on the eastern side of pier, looks to the Equator,
counterweight shaft is horizontal and points to west) The encoders has the following value:
- RA: 90 degrees
- Dec: 270 degrees
Steps:
- Switch on the system.
- Start the Ursa Minor program
- Connect to the MC5 using the "high level ascii protocol"
- Check the geographic position stored in MC5
- Check the time in the MC5
- Go to the "Initializing telescope" / "Init to absolute encoders"


