Setting up the closed loop tracking
Closed loop tracking means: Tracking without autoguider with help of high resolution encoder.
MC5 and OC5 can perform guider-less tracking control. It means, the electronic keeps the periodic error as low as possible, without using an autoguider. This is done with a high resolution encoder mounted directly on the RA axis of the mount.
Important: Before using closed loop tracking, the encoder settings should be correctly configured, as described on this page.
Ensure, that the encoder configuration is correct
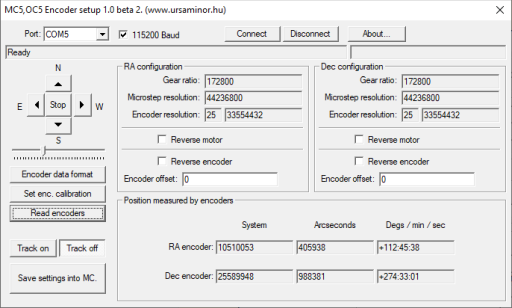
- Start the encoder config program:
- Connect to the MC5 controller.
- Start the tracking by press the "Tracking" button which is located near the bottom left corner of the window.
- Periodically press the "Read Encoders" button. The values are refreshed at every readout. Please note, that the value related to the RA encoder increments with aproximately 15 arcseconds per time second.
Setting up the closed loop control
You need the Encoder Tuning program. Download it from here.
- Start the program. The user interface looks like as the following image:
- The "Sim" checkbox should not be checked.
- Connect to the MC5 controller: Select the COM port from the drop down list at the upper left corner of the window, and press "connect".
- In the status field you will see "Connection established" message soon.
- Press the "Motor drive info" button, to see information about the connected MC5 controller. you can see many information, for example the firmware version, the encoder resolution here. Close the window to continue.
- Press the "Closed loop settings" button. A new dialog window appears.
- In this window, you can see several buttons on the right side: The two topmost buttons related to start / stop the tracking. Below them, there are buttons to enable and disable closed loop tracking for the Ra and Dec axis. The MC5 supports closed loop tracking on the Ra axis only. The two buttons for the Dec axis are for future developments, also does not use them now.
- At first, we will check the tracking without encoders, also with closed loop disabled. Press the "RA Disblae" button in the "Closed loop" panel. Normally the loop should be closed now, but this step is for safety.
- Press the "Start tracking" button. Now the mount should start tracking at sidereal speed, but without encoder loop. Let's draw a periodic error graph!
- The encoder measurement in the MC5 is always on during the tracking, also the MC5 is always ready to measure the periodic error and draw a graph. Just above the graph area, you see a "Start" button. Press this, and the program starts to draw the graph. Please wait a few seconds: The horizontal scale of the drawing is 4 pixels per second.
- As the control loop is not closed now (The MC5 is not compensates to the encoder), you can see that, the graph slowly diverges from the horizontal axis. This is normal, as the Fornax mount has a small, but not zero periodic error. Press the "Closed loop settings" button again, and switch on the loop (Press the "RA Enable" button).
- Close the dialog box, and see the graph. Now you should see, that the loop is active, and the graph is started to correlate to the horizontal axis.


